Sunday, November 12, 2017

Out with the Old, In with the NEW!

I've been going back and forth on what to do with this blog, I let it get away from me for a little while and a lot of the links, posts and extras are lost to me.  I decided to learn a bit more and either A.) make the adjustments needed or B.) start a whole new blog.  I went with B. I f you are still following this blog how about you come on over to My Little Kentucky Home and show your love there.
https://www.mylittlekentuckyhome.com/

I promise this journey is going to work out a lot better!

Thank you and see you there 


Wednesday, September 20, 2017

Jack O Lantern Fall Planter

I'm always on the lookout for cute but inexpensive ways to decorate for the Holidays or just  the seasons.  I have seen some absolutely gorgeous displays and decor in other peoples houses, but honestly I don't have the time or the resources for that.  We keep it simple and cheap!  While looking for some ways to decorate for fall I stumbled upon this adorable idea to turn a trick or treating pail into a planter.

http://gorgfabgoodies.blogspot.com/2015/09/pumpkin-candy-holder-revamp.html


The finished product turned out absolutely adorable and again it was so affordable!


I had two left over trick or treating pails from last Halloween, they were orange and green and a little bent but that wasn't really a problem.  I simply pressed the bent parts out with my fingers until they reshaped and got to work.  The pails had a small plastic handle that was easily removed by cutting them with plain kitchen scissors.


Honestly they wouldn't be too horrible just left this way, but I wanted something a little nicer.


I was trying to use what I had on hand, and due to some prior projects I had a can of white Rust-Oleum spray paint primer, it's made to cover plastic and I will typically use this to prime any plastic craft.  I'm honestly not sure if it's really required to prime these but I had it on hand and figured why not. I also had this nice hammered bronze color, also made by Rust-Oleum, for the finishing color.  I have noticed in the past that sometimes the hammered look works and sometimes it doesn't, for this project I wasn't really worried about the finish, just the color.


It only took about two coats of the primer to completely erase the green and orange colors of the pails.


The bronze turned out exactly how I imagined it, and the hammered detail actually worked this time as well.

There isn't anything fancy about these Jack O Lantern Pail Planters but I think they are perfect for my front porch.  I placed one on the table section of my front porch bench and the other on the steps leading to my front porch.  All in all, I spent a whopping $3 for the mums (they were on sale) and this entire project.  My pails already had a hole drilled into the bottom so I didn't add any extra holes for drainage.


Sunday, August 6, 2017

You Say Nightstand, I Say Bedside Table...


The DIY Re-Purposed Bedside Tables
Molly the Rescue Pug poses for a picture! 


My master bedroom is a mix match of furniture, odds and ends that have been given to me or have been bought over the years.  The dressers, wardrobe and vanity are all stained mahogany but don't really match in any other ways. I used to love full framed beds but I have recently decided that I prefer the simplicity of just a headboard. At the start of the year the hubby and I purchased a simple gray fabric headboard and I started re-decorating our master bedroom.  I chose the colors gray, white and teal because they seemed to be more neutral than many other colors and not too feminine or masculine. I love the mis match of the furniture but there is a downfall to not purchasing a matching set, we didn't have bedside tables. So, I scoured the internet for fun or different ideas for bedside tables.


There are so many non traditional bedside tables out there, when you cruise the pages of the internet!

http://diycraftyprojects.com/2015/05/20-great-crate-projects.html
http://woodesigns.4web2refer.com/


 I found this page (  http://realitydaydream.com/old-desk-turned-into-two-night-stands/ ) while pursuing the idea on Pinterest.  I love the idea of taking something old that isn't used and turning it into something new that is useful.  I didn't have an old desk but not long before finding this idea my dad had asked me if I wanted an old  vanity table, he had two that he didn't need and wondered if I was interested. I called my dad, asked if he still had the vanity and then explained my idea.   


I'm a big dummy and forgot to take a picture of the vanity before we altered it! However, I was able to find a picture online of a vanity that was very similar in design. First my dad took the mirror off and put it aside for use in something else on another day.  The middle section was simply cut off  in a straight line. 


The vanity we were using was ironically stained mahogany, there were some bad spots and honestly I wanted something that would pop against my wall and headboard.  I decided to paint the two tables, but first I had to sand them down.  Here are my tables sanded down and ready to be primed.


I used two coats of the Kilz brand Latex primer to prime the tables.  My dad always reminds me that if you use an oil based primer you must use a oil based paint, and same goes with the latex.  I like latex paint because I feel like it makes for an easier clean up job. 


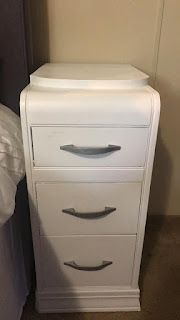
For the main color I choose a Rust-oleum semi-gloss white indoor/outdoor latex paint, again it took about two coats of paint before I was satisfied.  The handles that were originally on the vanity were a nice classic design but they were brass colored.  I decided to use the Rust-oleum gray textured indoor/outdoor spray paint.  I have used this spray paint on cabinet hardware before and they held up great! After all the coats of paint were dry I used Rust-oleum semi-gloss spray lacquer to seal it all and make for an easy clean in case of spills. 


Here they are as a finished product! I love they way they pop against the gray headboard and I love all the storage the drawers provide.  They may not have a lot of room on the top surface, but I actually like that.  If I have too much surface space I will clutter it up with a lot on nonsense!


I absolutely love the new master bedroom colors and the way everything is coming together.  I never re-do an entire room all at once, I like to get bits and pieces done here and there.


Monday, July 17, 2017

Adding Fitness To My Life and the Title


WOW!
Where have I gone, what have I been doing and why wasn't I updating my Blog.  Well, ladies and gents the answer simply was that life became hectic and there just wasn't much time to do anything.  Life often gets in the way of so many of our simple joys, and we have to just keep going forward and hope to get back to them; eventually.

Life has slowed down a bit and the summer is coming to a fast close, which means that I will once again have a bit more free time.  I plan to get back to blogging and start keeping this updated on a more regular basis.  I still love blogging and I missed it terribly.

This past year, fitness became a huge goal for me.  I wanted to become fitter, healthier and just happier about my looks.  I am in no way overweight, as of January 2017 I was 5'6 and 135 lbs.  However, I wasn't really all that healthy.  There is a phenomenon known as skinny fat, it's basically when you have a thin frame and build but you are in no way healthy.  How can you be skinny and fat all at the same time, how does that even make sense? Skinny-fat simply refers to the levels of lean muscle mass and the amount of body fat, having too little lean muscle and too much body fat gives you this look. I somehow have this ultimate metabolism that devours everything that I eat and drink.  Working as a second shift Police Dispatcher means that I would eat a lot of unhealthy fast food, and it contributed to my un-healthy obsession with Monster Energy Drinks. My unhealthy diet and lack of exercise is what created the skinny-fat look for me! 


Here's an example of the hubby and I before we started hitting the gym and making better choices about the food we ate. Here I am at skinny-fat. I am in no way shamming any body style, I like to encourage people to be happy with themselves. I wasn't happy, I wanted more muscle, I wanted more strength, and I wanted to FEEL healthier! 

Since January of this year, I have been hitting the gym on a very regular basis, 4-5 days a week.  My diet has changed in many ways and in some not so much.  I make a conscious effort to eat healthier now, but I am not on any strict diets, so to speak. I use supplements but nothing crazy, pre-workout for the energy boost and protein to help with the recovery.  I am in no way an expert, I am learning this as I go, I have a goal in mind and I feel like I am on the steady path to reaching that goal...plus in 7 months I have not hurt myself! I lift weights, I am trying to build strength and muscle mass and I know what my limits are!

There are so many body styles out there, too many to name and even more ways to achieve them. I have a mental image of what I want and I am steadily striving to reach it. Some people are going to tell me, eventually, that I have too much muscle or say that I may not look feminine to them. This isn't about them or their opinions this is about me feeling great in the skin that I am in.  This is about the journey I took finding my flaws and working hard to improve them. The journey of realizing that I could absolutely love myself, flaws and all, while still trying to change them.


I'm not going to get into detail, in this post, about the actual journey and the steps I have taken. For one, it's too complicated and would take too long plus I have a few posts planned out for that.  I wanted to get back at blogging and I wanted to explain that fitness will now be included in this blog as it's become such a huge part of my life.

I have some crafts up my sleeve, some rants that need to be ranted and just some more of the posts that have always been included in this blog. Sit tight and I hope you all enjoy all the old plus all of the new!


Friday, December 6, 2013

Toby's, The Elf On The Shelf, First Week...

This is the second year that we have participated with the Elf on the Shelf.  Last year I introduced the kiddos to the idea with the book, movie and a little note written by Santa about good-vs-bad choices and how he understands grace.
 
 
I just wanted to write up a short post showing what our Elf has been up to.
 
Day 1: Toby came in by parachute. I know that a lot of families make a big fuss the morning the elf shows up. Some even have elaborate breakfast's and gifts, yeah...we don't do that! It's not that I have anything against it, I just forgot that our elf was supposed to be there in the morning. I remembered at about 2 am when I was on my way home from work, so nothing elaborate was going to happen.
 
 
Day 2: With Baby Boogie more alert about Christmas and everything going on around her she has become very interested in Toby.  Toby must now hide out of the reach of a very tall almost three year old's hands! So on the second day he decided to sing Karaoke on the fridge using Babydoll's princess music player.

 
Day 3: Toby was feeling very playful (mommy was feeling very tired) so he decided to swing from the ceiling using Christmas ribbon.

 
Day 4: Baby Boogie is deathly afraid of Bubby's dinosaur, she won't go anywhere near the toy.  It has caused a lot of mean spirited-ness from her daddy and I and a lot of laughs.  Toby decided to wrangle up the dino and go for a ride.  Even though he was within reach, Baby Boogie never tried to touch him.

 
Day 5: Toby wanted to be a hero! Look up in the sky, it's a bird, it's a plane, it's Super Toby! Mommy had a lot of sleep that day!

 
Day 6: I finally got around to putting up the tree, but after hours of searching for the stupid legs to the tree there was no way that I was going to decorate it.  I had to tear my clean house apart, find the legs, then clean my house again.  Toby was nice enough to decorate the tree for us...using socks!

 
Day 7: Toby decided he just wanted to hang out, it's amazing how easy going that elf is when I have had very little sleep the night before, or had a very very long night at work! Nice Job Elf!