Showing posts with label Getting Crafty. Show all posts

Sunday, November 24, 2013

Making Christmas Presents Part 1 Tutorial...


I wanted to make Christmas gifts for different family members this year.  I normally only buy for the kids in the family and for my parents and in laws.  I came across a really cute pin on Pinterest with a tutorial on making Foot Warmers.  I knew automatically which family member would love this so I made my own...with a few small changes.
 
For the original tutorial you can follow the link below.
 
 
I had most of the cotton material on hand for this using fabric scraps from other projects but I did buy about a yard of black fleece and a yard of red fleece.  I bought two bags of white rice 3lb each at only $1.50 a bag.  This is a super easy, money saving and useful gift/project.  Even if you have to purchase the cotton fabric, you don't need very much per foot warmer.
 
First I measured an old..I mean old, why do we still have these, pair of Jerm's shoes.
The length measured at 13 inches, and the width was 10 inches. I added an inch to for hem allowances.
 

Now, I honestly don't know how fleece will hold up in the microwave but I do know that cotton is a safe fabric choice.  I wanted to use the fleece because of two reasons, one fleece eliminates the need for batting to insulate the warmth, and two because fleece is super soft.  So I changed the design a bit, I made a separate rice bag out of cotton fabric.
 
 
 Since the outside of the foot warmer was going to measure 13in x 10in once sewn together, I made the rice bag 12in x 9in. I cut the fabric 13in x 10in  to allow for a seam allowance, then placed the two printed sides together and sewed up three of the sides.
 

I filled the bag halfway up with the white rice. and then finished sewing up the fourth side.  I used about half my 3lb bag of rice.  I may have filled it a little too much...but the bag only cost $1.50 so meh not too worried.


Now for the foot warmer I measured a 7in x11in  piece of cotton fabric for the top cover of the warmer, and two 14in x11in  pieces of the black fleece for the main part of the foot warmer.  I hemmed the bottom edge of the cotton then pinned it to one piece of fleece sewing the remaining three sides (top, left and right ).


I then pinned the second piece of the black fleece to the already sewn together fleece and cotton. I placed both pieces of black fleece together,  You can't really see it in the picture above but there are two pieces of black fleece on the bottom and then the inside out piece of cotton.  I then flipped the cotton piece over the fleece so that the UK design was facing up.
 
 
Now you can place the cotton rice bag between the two pieces of black fleece.  But, how to keep the heat contained and the bag inside?  I added a strip of Velcro to the inside of each piece of black fleece.


The finished project looks a little like this on the bottom edge.


The Red Arrow: Where you slip your feet.
The Orange Arrow: The top layer of the black fleece, soft and warm on the bottoms of your feet.
The Yellow Arrow: The Velcro closure ad the edge of the foot warmer.
The Green Arrow: The cotton rice filled bag.
The Blue Arrow: Very hard to see, bottom layer of the black fleece.
 
Just a few changes made to an amazing idea.  I am very excited to give these to family members for Christmas and I hope that they will be as pleased with them as I am excited about them! By the way, you simply have to microwave the rice bag for about 2-3 mins, for at least an hour of piggy (feet) warmth.


If you like what you just read please click to send a quick vote for me on Top Mommy Blogs- The best mommy blog directory featuring top mom bloggers

Friday, November 22, 2013

Starting Our DIY Christmas...

Christmas decorations, in our house, don't usually make an appearance until the day after Thanksgiving.  This is was the tradition that my mom started with me, and I just can't bring myself to do it any other way.  I have always been very type A about my Christmas decorations.  They have to be perfect, organized and in sync.  Who am I kidding?
I have four children ranging from 11 to almost 3.  Why can't the decorations be more fun?
 
The goal for Christmas this year, kid made and approved decorations; plus a few handmade touches from me.


I have seen tons of craft cones covered in burlap, on Pinterest for Christmas decorations.  I am not really fond of burlap, it doesn't really fit in my house, but I loved the look all the same.
 
 
Supplies:
  • 1 1/4 inch Ribbon (mine were spools about 9 ft long)
  • Styrofoam craft cones
  • Hot glue gun and glue
  • Candlesticks (optional)
  •  


The ribbon that I found was on clearance for only $2.00 a spool and I just loved the colors.  The design really doesn't scream Christmas, but they are red and green!
 
I cut a strip of the ribbon and glued it to the bottom of the cone and then repeated it on the other side.


Starting from the bottom, I simply started wrapping the ribbon around the cone at an angle. Gluing the ribbon each time I came back to the starting side of the cone.


During the wrapping process the ribbon wasn't really staying flat to the cone, but I honestly liked the look of it with the folds.  I think that it added a nice little touch of texture to the decoration.


The three candlesticks that I placed the cones on normally sit on my kitchen table, until about a month ago.  One of the kiddos, trying to clean the table after dinner, broke one of the candles.  Not too big of a deal, but since then, only two candlesticks have been on the table.  Now I have three again, and a pretty table decor.


Tuesday, May 28, 2013

REFASHIONING A NEW SHIRT

In my search to refashion clothes for the girls in this family I have found lots and lots of  T-shirt refashions. T shirt refashions tend to look pretty easy, and who doesn't have bunches of T shirts laying around the house?

Baby Boogie showing off her style, and not choking the kitten, today will be a good day!


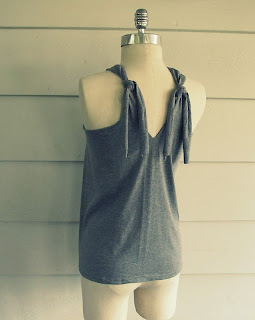
I have recently been working tons of over time, but I wanted to try out a T shirt refashion, so I skimmed my Pinterest boards and came across this amazing and simple looking idea.


I have tons of T shirts but no plain ones.  I didn't think that this would look right with any designs on the shirt , and frankly I wasn't ruining my Batman or Captain America shirts.  You can't cut those guys up!  I found a purple turtle neck that Babydoll has outgrown and never really liked wearing ,she loved the color but the turtle neck annoyed her.

This needed a few alterations, the turtle neck and the sleeves needed to be gone.
With the sleeves and the turtle neck cut off, I just had to follow the directions on the blog.  I had planned on altering my pictures to show you how this was done but my photo editor hates me, and well you can go back to http://wobisobi.blogspot.ca/2012/07/no-sew-halter-3-diy.html for all the directions!

Basically you are cutting a V neck out of the front, then cutting two squares out of the back.  It really is such a simple DIY refashion and it is NO SEW I know some people love to see those two little words!

Here is Baby Boogie modeling the front of the shirt, I put a cute little blue jean skirt with it, well because it was the first bottom cover I could find that was clean. 

Here is a close up of the back.  The turtle neck has one of those printed tags on the inside of the shirt and you can just see the little bit of white on the left sleeve but it's not a big deal and if it starts to bother me I could always cut it off.

This refashion really took me no time at all. I am serious it took me a total of maybe 15 mins, the toughest part was getting Baby Boogie to stand still and model the shirt for me!

Now I need some plain t-shirts in Black, White and Dark Purple, for ME!!


Top Mommy Blogs - Mom Blog Directory

Monday, May 13, 2013

RE-FASHION-ING!!!

I am a thrifty momma, with kids these days you have to be.  I tried the coupon thing...didn't work out so well.  Don't get me wrong if I happen to notice a coupon for something that I buy, I do cut it out and most of the time use it before I loose it. When I have to buy the kiddos clothes, shoes, or anything else I shop around before I commit to paying for it.  I will go to every store that I know sells what I am looking for and find the most reasonable price.I brag about how much money I SAVE! I have a few friends who brag about how much things cost, that is so not this momma's attitude.  The more that I can get for mine and Jerm's hard earned money the better I feel.
 
The other day while cruising through Pinterest I stumbled onto a pin that led me to a Blog that just may change mine and my daughters wardrobes for life!  The blog enabled me to accomplish this!
 
Ok it doesn't look like much right now....but I will show you the magic in just one moment!
 
First let me introduce you to my inspiration.  She has been on TV, and has an inspiring blog!  You have to check out her blog, I could tell you all about it but honestly it will be so much better for you to see it for yourself. Warning: I spent an entire night trying to catch up of years of blog posts I am addicted!
 
So my little re-fashion was for baby Boogie, why because she is tiny and being the youngest of four I have a lot of "out-grown" clothes from her older siblings so this was a free craft.  This was not my first attempt, my first two are only worthy of anything with the words craft FAIL included!!
 
I found an adorable shirt that Babydoll outgrew last winter. It isn't a very thick shirt and other than the fact that it has long sleeves would be great for the summer.  Plus I love the print, not too girly but fun!
 
So I took out my scissors and cut off those long sleeves the weather is finally warming up so we don't need them!  When I cut off the sleeves, I went along the hemmed lines...why? So I wouldn't have to hem them later!!
 
The new sleeves were still a little to wide for what I wanted, so using a running stitch I cinched them in a little.  Then I took a couple pieces of the sleeve (that was cut off) and tied them up!

This dress was now in working order, but...it still seemed a little plain to me. I snazzed it up by cutting three strips of fabric from the left over sleeves...
 
Then using a running stitch again I turned them into RUFFLES!


There you have it! My first (non-craft-fail) re-fashion! Baby Boogie has worn it once so far, but she seemed to like it just fine! The length was perfect and the weight of the fabric is light enough for her to play outside and stay cool! Plus she looks too cute in the little dress even though she never likes to stand still long enough to be a decent model!


Top Mommy Blogs - Mom Blog Directory


Tuesday, May 7, 2013

PITTER PATTER OF LITTLE FEET...

I am still pretty new to the crafting game, not really the expert crafter.  Pinterest and other blogs are the basis for most of my inspiration.  There have been a couple times where craft supply stores have inspired me. Crafting is simply a hobby for me, I don't plan on making my fortune with it!
 
When Jerm and I got married  last July I wanted something to represent the year that our two families really became one.  I found this adorable foot stool idea on Pinterest and knew that it would work perfectly.  Not only would the foot stool represent our family anniversary but it could be a functional piece too!


I went thrifting! After a couple of thrift stores, a few Goodwill's and my local Peddlers Mall I finally found the perfect sized foot stool for my little project. Only paid $3.00!


Now this brown color wasn't going to work, so I sanded it down a little and then searched my supply of paints.  I found a beautiful Martha Stewart Wine colored multi-surface paint in my stash!


I painted the entire foot stool, using about three coats of paint.  It didn't use the entire bottle of paint and dried pretty quickly!
(This is the same color that I used to stencil my lamp up do)

 
The color in this picture makes it look a lot more pinkish than it really is. This color has become a reoccurring color through-out my house. After the paint dried I was going to use stamp ink to copy the kiddos foot prints, but my ink was dried up so I simply had to paint my kids feet with black  Martha Stewart Paint. Then we just placed the feet firmly down, and lifted straight up (a lot harder than it sounds)!
As you can see they didn't come out perfect but meh, it's not too big a deal!
 
 
I then took a very fine tipped paint brush and painted the sides and front of the foot stool, to make it even more personalized to our family!
Last name and the date we all officially became a family.
 
I don't know why I started referring to my family this way but it's now our thing.
Probably because when I tell people we have four kiddos they look at me like I just said 40 kiddos!
 
All the boys nick names, I am really really bad about using nick names vs given names.
 
All the girls, see we have our nick names too, You hear your given name in my house, you KNOW you are in trouble!!
 
 
The kiddos use this foot stool sometimes in the bathroom, when trying to reach something in the kitchen; or for any other reason their imaginations can come up with.  I have used it for reaching things on shelves and as a time out spot on a couple of occasions. It feels kind of wrong sometimes to use it as a time out chair because they kids and I made it together! :)  We actually get a lot of use out of it.  I didn't put a protective coat on it and the paint has held up just fine.
(yeah I should have posted this a couple months..heck almost a year ago, but I lost the pictures *lol*)


Top Mommy Blogs - Mom Blog Directory


Thursday, December 20, 2012

ADVENTURES WITH BIRTHDAY CUPCAKES!


Our family loves cupcakes! I love the fact that I can make them at home, and have a cheap alternative to expensive store bought Birthday cakes.  I can't make or decorate a cake to save my life! I can make cupcakes though, and recently I have been attempting to decorate said cupcakes to match our Birthday themes.

My first attempt was with Monkey's 10th Birthday.  We opted out of a party and instead went to a local pumpkin patch (October Birthday) with all the kids and Monkey's best friend.  So I decided to try and make monkey cupcakes for my Monkey!  ***NOTE: When Monkey was a baby he was huge..8lbs 11oz and 22 3/4 inch long..and he only got chubbier as he got older so I called him Chunky Monkey. Then he thinned out when he started walking so I dropped the chunky and have called him Monkey since***


My attempt at a monkey cupcake.

I simply made a box cake mix batch of cupcakes. I used chocolate icing for the face.  I cut the mini Nilla wafers using a standard steak knife for the ears, and standard size  Nilla wafers for the mouth.  The eyes were made with Reece's peanut butter chips and the nose and mouth were gel like cake icing.


This was the inspiration picture I found on Pinterest, unfortunately it doesn't link to any site.
In hindsight I should have placed my monkey ears more to the side then the top, but hey we ate every one of them and Monkey thought they were great!


Baby Boogie's 2nd Birthday was just this past Monday so we threw her party Sunday evening.  It was just family, and the kids in our family.  We had an Whooo is turning two theme, so it was centered around Owl's.  I had found some great owl themed pink/purple party decor at Wal-Mart for really cheap $1.00 each. 


My attempt at an owl cupcake.

Using a box cake mix (funfetti) I made the cupcakes, and used chocolate icing for the face. I separated Oreo's to get the eyes...Oreo's don't like to separate cleanly so I just used a butter knife to scrape all the missing filling from the non used side of the Oreo and tried to smooth it on the side I was using. I used gel icing for the pupils of the eyes and almond slices for the beaks.  I was planning on using the almond slices for ears but Jerm ate them before I could! Oh well, he didn't know. Don't worry about wasted plain Oreo sides..we ate them!


Here was my inspiration, another broken link on Pinterest!


Jerm's Birthday is today and he said he wanted a marble cake. I reminded him I don't do cakes, but I could attempt marble cupcakes.  


Marble cupcakes.

I simply bought a box mix of Yellow cake and one of Devils food cake.  I put a large spoonful of the yellow into the cupcake liners, then a small spoonful of the chocolate. 
( I don't measure things...I just go with it)
I used a butter knife (for lack of a better word) to fold the two mixes together.  I didn't want to swirl them too much because I was afraid the Yellow cake would just mix right into the Devil's Food cake.  I was going to attempt a marble affect with cream cheese and chocolate icing but yeah that wasn't too pretty! :)

I never practice these before hand, and I didn't have any real directions but the kiddos and the hubby seemed pleased with the results so I was happy!

Sunday, December 9, 2012

CHRISTMAS TREE SHIRTS AND HAIR BOWS!!

Our family really doesn't dress up for Christmas.  Normally I just buy the kiddos funny saying shirts that I can find at Wal-Mart, pair them with a pair of jeans and we are done!  I used to buy the kids new PJ's and let them wear those but with the family dynamic changing over the years and different traditions that stopped working so well.

This year I decided to make the girls cute little shirts that I found on Pinterest. 
There are so many people who have them, it would be a nightmare to link them, plus I didn't follow anyone's directions so I don't feel too bad about it!

All you need is a shirt, some ribbon, fabric glue, hot glue and something to represent the star on the tree.

  1. I measured the width of the bottom of the shirt, the subtracted 2 inches to get the bottom row.
  2. Then I cut each piece of ribbon 1 inch shorter than the one before that.
  3. I measured the width of the space between the arms of the shirt, using that spot as the "star" placement.
  4. You can hot glue the "star" on, or sew it on. Depends on how sturdy you want it.  My girls are just wearing it on Christmas, so I hot glued mine.
  5. Leave a little space between the "star" and the first row of ribbon and then use the fabric glue to glue it down.
  6. Keep spacing and gluing all the ribbon pieces down.
  7. I cut a little bit of brown ribbon and made it the base, see simple!
*Helpful Hint: Make sure to burn the edges of the ribbon so it doesn't fray!


I made a lot of these today for most of the little girls in my family!


Babydoll has a red version!


Her little sister on her moms side has a pink one!


My nieces who are sisters have matching black ones!


Baby Boogie has a white one, I had more time to spend on this one, plus is seemed too simple with just the green tree (the other ribbon had white backgrounds and didn't show too well) So I added buttons as ornaments! Again, you can sew these on, or like me take the easy route and hot glue them down!


Each little girl got a bow to go with her shirt, except the youngest niece because she wont wear them!

First measure about six inches of ribbon. Cut four of these!


Fold one side three inches in and glue it down, then repeat with the other side!


Make two of these then glue them down in the shape of a little t!
Then simply take your two t's and glue them together. Cris crossing them.
 You can add buttons or gems to the middle, you can also sew these instead of gluing them.
Then I just glued the bow's to an alligator clip and there you go...Christmas hair bows!

In a previous post I added a link and talk about covering the ugly shiny metal of an alligator clip you can go HERE for that.


Shared this at: