Saturday, August 25, 2012

Ninja Star Coasters....?

Back in the days of Wedding scrambling planning, I learned how to make coasters out of bathroom tiles. I found a picture on Pinterest, figured out the basic way to do it. (Am I the only one where half the pins I find, link back to nothing?)  I was going to use the coasters as favors for the wedding using the stamps I used for the invitations as a way to decorate them.  Then in all that scrambling planning I lost track of time and it was one of the few DIY projects that had to be tossed. I gave the two boxes of bathroom tile to my dad minus the few I had practiced stamping on.  The other day I decided to make our family some coasters out of the left over tiles.

My basic inspiration came from here, but I did change a few things due to my tiles being stamped and just for my own preference.


Supplies:

  1. Four Ceramic Tiles: Bought these at Home Depot $25.00 for box of 80, I had a gift card so none of this came out of pocket.  These particular tiles are 4.24 x 4.25 they also sell them individually for under $0.30.
  2. Mod podge
  3. Foam brush
  4. Cardstock: I am sure you can use regular construction paper, news paper anything you like, but I wanted cardstock because it was thicker, and less bubbles. I bought four sheets for $0.29 each, but I still have enough to make another set, or use for some other small project.
  5. Felt: I changed it to an all felt bottom instead of felt circles because I didn't like how the bottom of the tile looked.  The felt was $0.25 per sheet, and I used one sheet to make all four coasters.
  6. Lacquer: this cost me like $4.00 but I can use it on a lot of other projects, the can is still really full.
Total Cost: about $5.50 for four coasters!


Step 1:

You want to cut your paper down to size. I had to cut my paper to 4.25 x 4.25 because of the stamps on the tile.  If you would like a nice edging around the paper simply cut the paper down to 3.75 x 3.75. It gives you a pretty edge of what ever color your tile is. This is where those handy paper cutters really come into play.


Step 2:

Apply a thin coat of mod podge to the tile using your foam brush.


Then place the paper where you want it, the plus to card stock is that it is thicker so you can slide it around till you get it where you want it.  Let the paper sit until it is dry, I just continued with other tiles while letting the ones before dry.


Step 3:

Apply mod podge to the top of the paper, this is really important if you cut the paper smaller than the tile, it will prevent the edges of the paper from peeling up.  


I allowed the first coat to dry then gave each tile a second coat.  The thinner each coat the faster they will dry.


Step 4:

Spray each tile with a good coat of the Lacquer, make sure you are in a well ventilated area!


I gave each tile two coats of Lacquer, letting them dry in between.  The lacquer allows the paper to stay dry when glasses of liquid have condensation dripping down.


Step 5:

Coat the back of each tile with mod podge (only if you are attaching a full sheet of felt)


I don't like the way that the tiles look on the back, so I used a full sheet of felt to cover the back!


You can buy the little circles of felt at most craft stores, or in craft sections, some are even self adhesive.  You are using the felt to prevent the tiles from scratching your tables.  Just go with whatever you think would look better!


Finished Product!
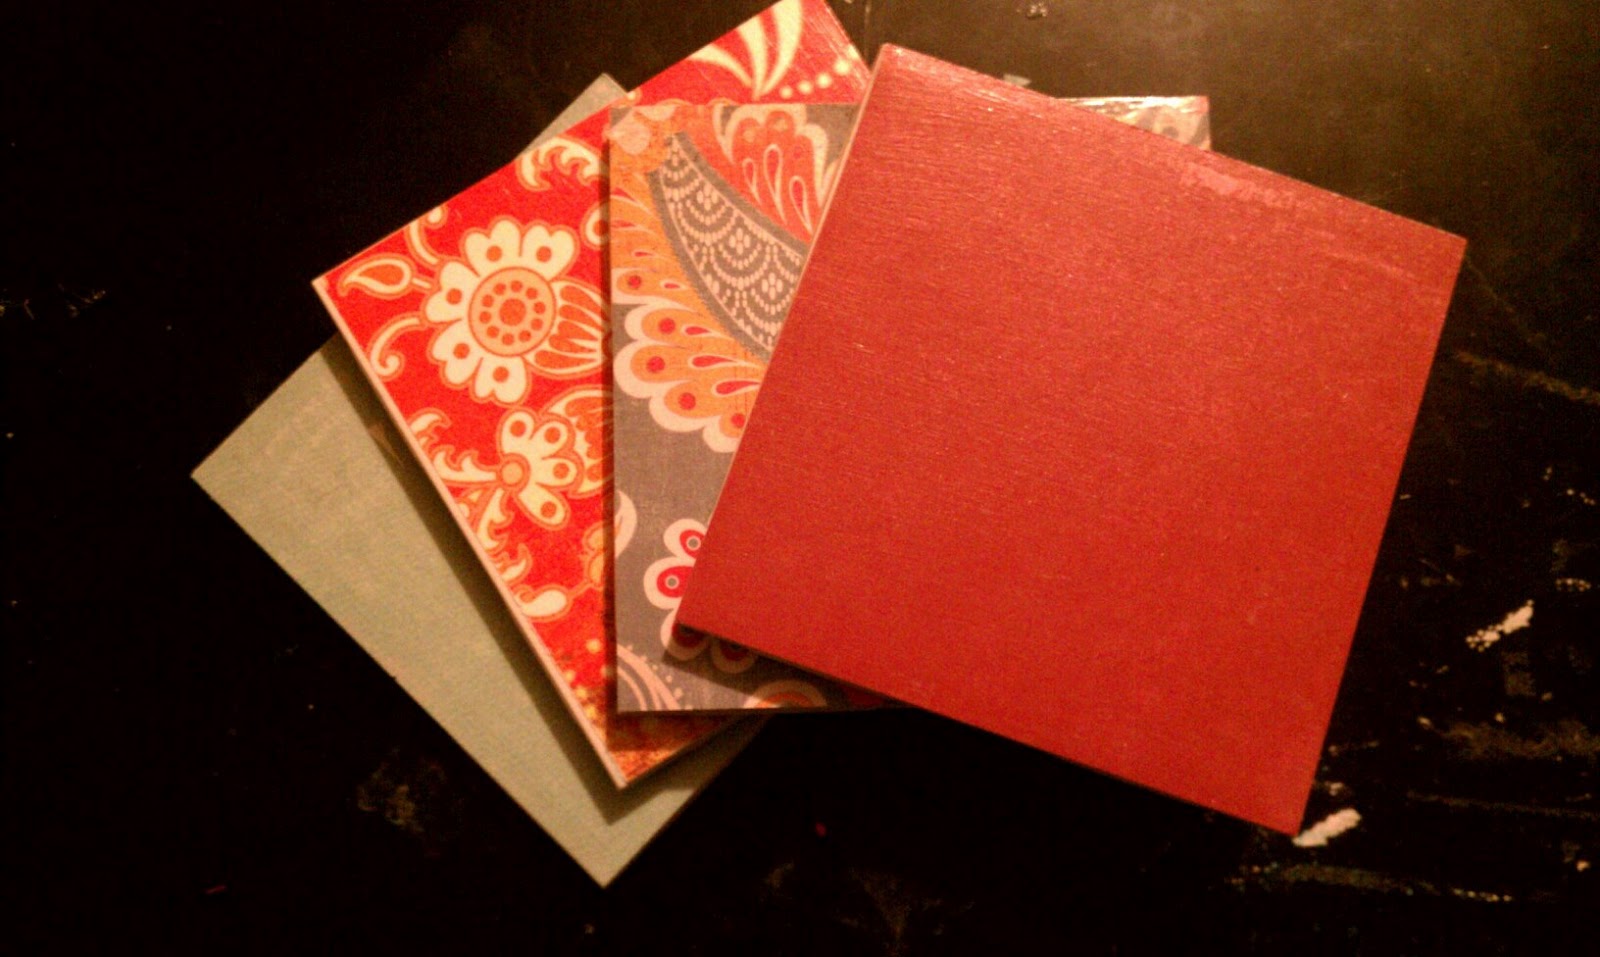

We like to use Fall colors in our decorating.  I love fall, I am originally from Oklahoma and there isn't a season called fall there! :) I love the colors and Jerm says they are relaxing and not girly.  After thinking about these coasters I realized that with an almost two year old who uses our living room as a play room that these may become weapons for her.  I think that for now I am going to place them on the Dining Room table and use them as bases for pillar candles ( the electronic smell good kind) At least until I can trust her not to ninja star them at my head!


Not that this sweet baby would ever do something like that right....


P.S I linked this post up with Make It Yourself Monday so head on over there and check out some other cute ideas!


Monday, August 20, 2012

I got my first award!!

First off I want to thank Mama  @ http://www.mamasmumbojumbo.blogspot.com/ for nominating me for this award, go and check out her blog!


I was super ecstatic to realize that another blogger from the Top Mommy Blogs awarded me with this award!  This is my first award so it's pretty dang cool...ok there I go showing my age again.  Honestly I have no idea what the kids say anymore!


 And now for the rules:

1. Include the award logo in a post, or on your blog page.

2. Answer 10 questions about yourself.

3. Nominate other fabulous bloggers.

4. Link your nominees to your post and comment on their blog letting them know about the award.

5. Share the love and link the person who nominated you.

Now, for the Q & A...

1. What would you most like to change about yourself?
 I expect way too much from my children sometimes.  I tease them that they came out of the gate strong so now I have high expectations, but I know that I need to let up sometimes.  It is a work in progress, but there has been progress!


2. What is your theme song?
Avril Lavigne "Complicated"  I sing this to myself when I'm too worried about what others are thinking, and I am not acting like myself.


3. One part of your life, a memory, action, etc., that you wish you could surgically remove from your brain.
I had an appointment once to meet and adoption agent to help me give a child up for adoption, it never went farther than that. To this day even making that appointment haunts me every time I look into my child's beautiful smiling face!  I am pro adoption, but I can't believe I almost gave up my baby because I didn't think I could raise another child by myself. I did!


4. What generation do you wish you had been a part of?
The 1920's loved the fashion, the music, everything!


source 


5. What was your favorite childhood toy?
Gizmo my stuffed animal cat, I have had this toy longer than I can remember!  He has gone through many surgeries, but he is still with us, I have to fight my children off him all the time!


6. What is your favorite housecleaning chore? 
Organizing, I love to organize things even if they don't always stay that way in this household!


7. Do you twitter?
No I am afraid it would be another thing that suck me in...I think I have an account though LOL

8. Any goals?
I want to finish my BA in education, but the fear of going into serious debt then not working as a Teacher scares the tar out of me.  It doesn't have the best getting hired chances in my area at the moment, and I would hate to have a BA in education but do something totally different with it!


9. Do you drink margaritas all the time?
No tequila and I don't get along, it turns me into a mean person.  Then again, I really don't drink much, if we go out, I may have a sex on the beach though.  Ha ha I was the DD for my own Bachlorette party!


10. What is the ugliest car you've ever driven and were you embarrassed to be seen in it?
For awhile when I was in between cars and a single mom with two kids, my dad let me use the 1987 Mercury Grand Marquise that my great aunt had willed to him.  She only drove it to church and wal mart but really??? This car was almost as old as me, and I was driving it in 2006!  I called it the "ghetto sled" LOL Then the transmission decided to go out during a 12 hour road trip, lets just say I kicked this car for years!


Now to nominate a few people who I think deserve this award:

 Lisa @ http://ptlforgrace.blogspot.com/
Jennifer @ http://www.boogiesnbooboos.com/
Eliza @ http://babycravings.blogspot.com/

There were a list of other blogs that I think deserve the award, but I am not the only person who feels that way because they already got it! LOL


I mustache you, do you like......Coffee?

Coffee...who doesn't love coffee, especially when it is in your favorite mug?  I found the cutest coffee mugs on etsy the other day.  I wanted a set of them but they were sold.  I had also seen a tutorial on pinterest on how to paint coffee mugs.  I have seen the ones where people use sharpies, and know that they don't last so I decided to try the painted ones.


 The cute ones I found on Etsy!


I went out to a local thrift shop and found two white coffee mugs, they didn't match but I liked that about them!  They only cost me $.50 each so they were definitely worth $1.00 total.  A friend of mine was thrown a baby shower that had a mustache theme to it, each invitation had a cute little mustache that you cut out then brought with you to the party for a prize giveaway. (I think) Unfortunately, I was unable to attend the baby shower thanks to everyone plus one taking off work that same day. The last weekend before school starts is not an ideal time to finally do that family outing you planned for all summer people....you bunch of procrastinators!! LOL  So I cut the mustache out then taped it to the mug using regular masking tape, I then traced the mustache onto the mug with a plain old pencil, and removed the paper mustache after.  The pinterest tutorial used porcelain painting pens for their mugs, but my local Micheals was out of the pens, and I have no patience so I bought a container of brush on paint.  The brush on paint was limited in color but I found a really really dark green and bought it.  Ok I will be honest, the company is a foreign one, I couldn't figure out what the colors were (the shelves were out of order getting ready to be restocked)  and I thought that it was black LOL  The paint cost a whole $1.50 on sale and well was worth it.  I used a fine tip brush to paint it on (and if you make many multiple layers of the dark green, allowing each to dry in between...you get black yay!!)

The porcelain paint I used it is called Vitrea


I then allowed the mugs to dry for the instructed 24 hours, and then let them dry for another 48 because everything got crazy around this house for a couple days, thanks school paperwork that I have to fill out for all the kids even though they go to the SAME school.... and all that information is the same.  Then I placed my mugs upside down in the oven at 320 degrees (the bottle gives you the Celsius temperature, so I had to do some major math skills get on Google and have them calculate it for me) for 40 minutes, then plus an extra 15 because that is when Boogie decided she wanted to wake up from her nap, just as my oven timer was going off!  I then placed them in the dishwasher and washed them.  Jerm and I have both used ours, and washed them a couple times in the dishwasher and they still look like this!

Aren't they cute?  Especially for a grand total of $2.50!!


I do think that I should have trimmed the mustaches down a bit, but Jerm and I just started really drinking coffee everyday thanks to the new coffee pot we got as a wedding gift.  I know how did we survive before? (Monsters Energy drinks!!!) So I didn't have a lot of mugs and wanted to try this, they are not as perfect as I would like them to be (you still see a little green around the edges) but I am going to buy the pens and try some other designs.  I want to work out all the kinks, I think personalized DIY coffee mugs would make great Christmas gifts to Teachers and others, and I have four months to work on them!


I linked this up with a link party why don't you head over there and check out a few more cute and fun ideas!


Thursday, August 16, 2012

Writers Workshop...share your earliest childhood memory!!

 There is a blog that I have recently started reading (like it's crack) , I mean honestly I think I have been  reading this blog more than I have been working on my own for the past week.  The author of the blog (Robyn) has been blogging for a while so I have about a years worth of posts that I have been catching up on.  Anyway before I ramble on, and you have no clue what I am talking about.  The blog I have been reading here  http://www.hollowtreeventures.com/ links up with another blogger who hosts a Writers Workshop.  This mommy blogger (Mama Kat) http://www.mamakatslosinit.com/ gives 5 topics that you can choose from each week and there you go...no really I mean it go...get working on that blog post! LOL

    I decided that I am going to give this a shot because:

  1. I haven't made any crafts, or have any other ideas
  2. My house is a mess, and I don't want to even think about it at the moment.
  3. Finally, all the kids are sitting together watching a movie quietly...for now 
* This isn't my earliest memory, honestly this was the first thing that came to mind, so I am sticking with instinct*

 Now I am probably showing my age here, but how many of you remember the reading program in Elementary school?  You know the one where you read a certain amount of books, get a sticker to put on a pin, then turn the pin in for a free personal pan pizza from Pizza Hut?


Who doesn't love a personal pan pizza...for free...as a child!?


  Well if you have not a clue what I am talking about...the program was called Book It!! I loved Book It, I was (still am) an avid reader. This program was perfect for me.  I got something free, for doing something that I already loved to do.  What could be better than that????

Tell me you didn't think that this was the coolest pin ever...if you say no, your lying!


 Later in years (4th grade year for me) my school decided to switch programs, this new program was called 600 minutes.  You had to keep a log about what books you were reading, and how many minutes you read each day. After you completed the program (600 minutes of reading, within about two months) you were given a free ticket to Six Flags!! Don't get me wrong I liked Pizza but you have rides, games, fireworks, and pizza at Six Flags!  Now for an avid reader (like me), who could and often did/does read an hour a day, this was cake. I mean honestly I was that nerdy kid that had The Babysitters Club books delivered to my house!  

Please tell me I wasn't the only one who read these books, and then tried to start my own Babysitters Club?! Right?


So within ten days this kid was done! I was so excited to turn that paper log in, I knew I was the first kid in the school to do it....yeah a little nerdy show off dancing was part of the process.  My teacher, after looking at the paper, told me that my mom must have signed off on a fake log, that there was no way that I was already done!!  Come on lady I am part of the school AR group (advanced reading) are you kidding?!?!  I was so upset, my teacher called me a "liar" in front of everyone (basically), I had told everyone I was done, and now they all thought I had lied!  The teacher refused to take my log, and told me to really read this time or I wouldn't be getting a free ticket.  My mom was PI$$ED!!  She complained but it did no good, so she made me a fake log, a month later we turned it in with a lot of BS 15 minutes here, 20 minutes there kind of entries.....yeah great job teacher, way to make children proud of their accomplishments there.

The teacher was a great teacher, I just think that she honestly didn't think that a 4th grade child would read an hour a day!  I think my teacher was really just trying to keep me honest. Come on fess up, you know that there are parents out there who do their kids homework, or even lie about it.  She probably thought she was teaching my mom a lesson in honesty too! 


My first roller coaster The Texas Giant!
Tallest wooden roller coaster in the...US at the time!
I laugh about it now, and it didn't scar me for life.  I still read like crazy, mostly in the bath when the kids are asleep.....heck my bathwater gets ice cold and I never even notice it sometimes.

Talk about reading in the bath!!
I need one of these *hint hint* Jerm


This takes reading in the bath to another level too!


* I found all the pictures on Pinterest, some went to actual sites while others, yeah to nothing!*

Go check out some of the other posts inspired by Mama Kat, just click the button below, I know its good for a few laughs!

Mama’s Losin’ It 


Tuesday, August 14, 2012

Wall Art for Baby Boogie

Like so many of my previous DIY posts start....I was cruising on Pinterest, and I found some adorable wall art made out of toilet paper rolls.  I like to save money, I like wall art, and this was very cute, and super super easy.


I had the perfect wall to hang it on, and I think it looks pretty good!
I cut each toilet paper roll into multiple 1/2 inch strips.  Played with the design that I wanted, then hot glued them together.  You can use regular Elmer's type glue, but that takes longer to dry.  After glue is dry spray paint it, and there you go Wall Art!


TIPS:

When you glue it together, make sure that on the bottom side, all the rolls are level.  If they aren't it won't hang very level!

I got about eight strips per roll.  I had friends save some for me too, and the rolls for different brands tend to all be 4 inches in length.